
TubeNetRadio - The Raspberry Pi powered tube radio

The idea of building a DIY internet radio embedded in an old tube radio
came across my mind a long time ago. Unfortunately back than setting up
Linux on an ARM system was something for the real hackers. I saw no
chance to finish such a project with a good result in a reasonable time.
Things changed and the Raspberry Pi become the ARM Linux system for the
masses. With the unified hardware and an excellent documentation
days of desperate debugging turned more into a copy-and-paste procedure.
The introduction of the Raspberry was definitively the moment to start the project. In this article you can read the story about building a retro internet radio and network media player - the TubeNetRadio. Please refer to my blog to learn more about the software running on the Raspi. Here I will focus more on the mechanical part and the integration of the Raspberry Pi into the tube radio.
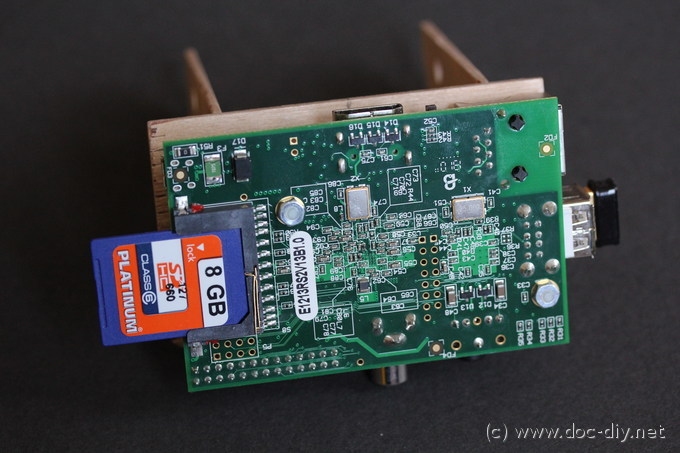
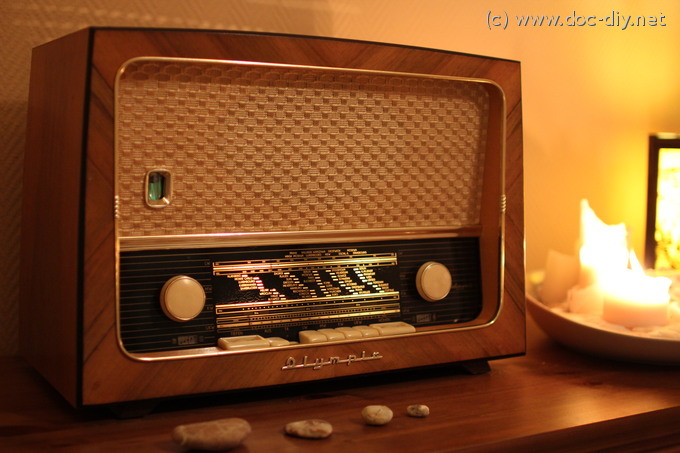
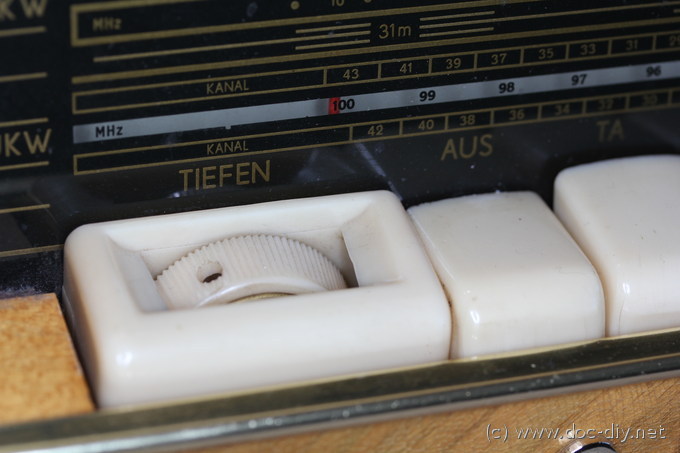
The basis of my project is a beautiful old tube radio from around 1959 built by the German Sachsenwerk, model Olympia 59-3W. Since I bought it in a pretty good condition I decided not to change it as little as possible. The only visual evidence of the modification are the two buttons in the back plate as shown below.
2019 Update with solid state amp - the magic eye is dead
After a couple of years of reliable operation the radio started to suffer from
spontanous humming noise.
Instead of overhauling the tube amp I decided to replace it by a solid state module.
I bought a cheap class-D amp with an integrated Bluetooth module on it (TDA7492 + CSR8635).
I know it's a real sin... At least the power consumption dropped from 50 W to less than
10 W now. And there is a Bluethooth connection now.
The step led to a few drawbacks. There is some clearly audible digital hissing noise. Two
switching converters, a class-D amp, WiFi and Bluetooth are not the best frieds of audio
circuits.
I lost the beautiful bass and treble regulators of the radio. I will try to use software
equalization on the Raspi. Bumping up highs and lows in the current setup would be nice.
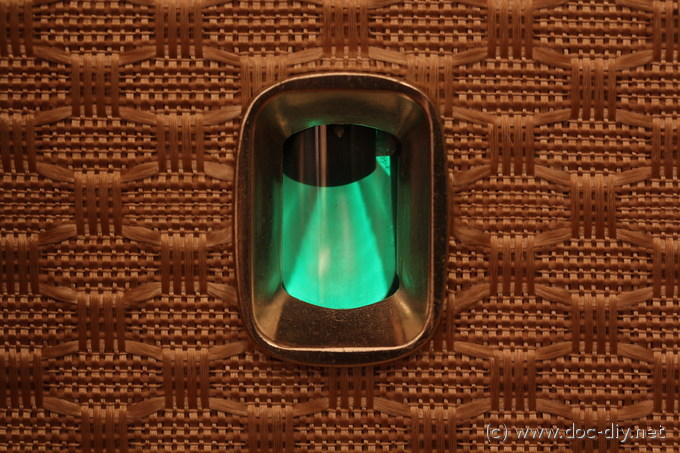
I had to replace the two Festoon bulbs and used some yellow LEDs fed from the 12 V line.
The original volume potentiometer lost it's function. I added a new one mounted in the back
plate directly between the amp and the Raspi. I works much smoother now.


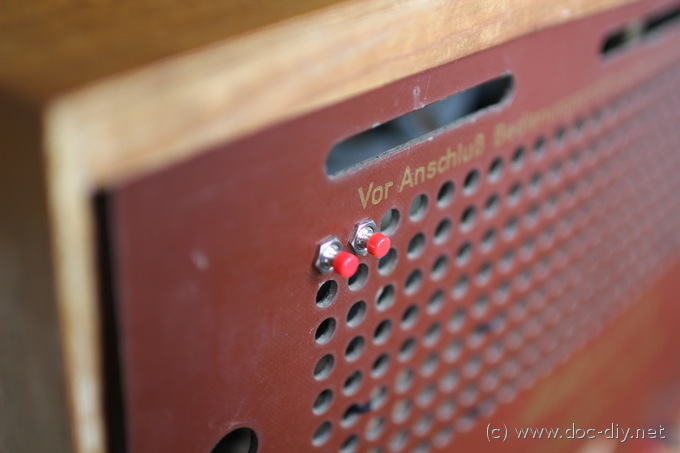
The result of the modification is shown above. There is a standard 12 V power supply. With 12 V
the new amp will drive the original 8 Ohm speaker with enough power, but without the risk of
destroying it. The Raspi is supplied from the same 12 V line over a 5V step-down DC module (soldered on perf board).
The Pi and the amp are connected through a potentiometer (2.2 k log type). The stereo channels are
mixed down to mono via two 100 R resistors before the poti. The radio is still turned on by
the original button in the front panel (the teeth).
Back to the original article...
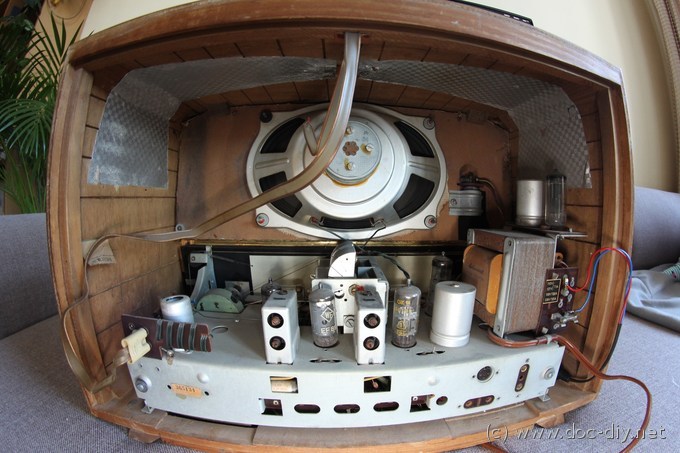
Hardware
The image above shows the hardware modifications needed to embed the Raspi in the tube radio. The hardware is rather independent of the software running on the mini computer and can be used with a variety of software solutions. Things become of course more complicated if you wish to use a display.
Mounting of the Raspberry Pi
The Raspberry Pi has to be mounted somehow inside the radio. If you don't plan to access any of the ports from outside the mounting becomes trivial. The back plate has a perforation which can be used to attach the Raspi module with cable wrappers for example.
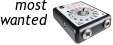
Things become more tricky if you plan to use the Ethernet port, HDMI or USB later without opening the radio every time. The Raspberry PCB has just two mounting holes positioned "somewhere". To mount it with one of the sides facing the radio back plate a helping construction is required. I decided to have HDMI accessible, but it's a matter of taste. It is the preferred choice if you install a media renderer like Xbmc capable of playing movies and controllable per smart phone. I also like the idea of connecting a full HD flat screen to a 60 years old tube radio!
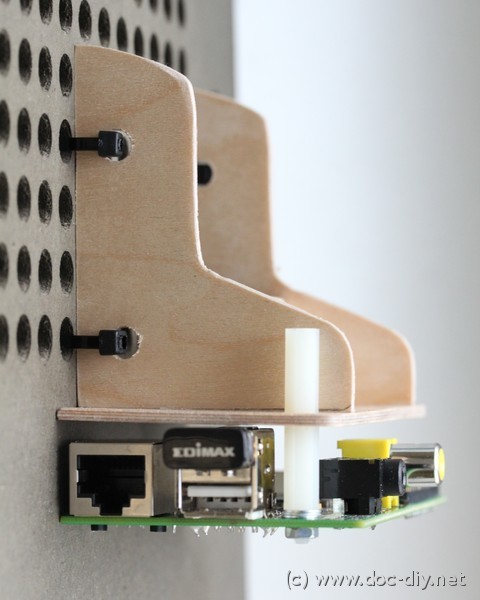
The mount I have designed is shown in the pictures below. I saw no other way then building this wooden baroque balcony. Yes, I also have the feeling it's somewhat over-engineered. At least no holes have to be drilled in the radio enclosure. The Raspi module is fixed with plastic spacers (15 mm + 1 mm washers). The Ethernet port is the highest component on the board having 16 mm of hight. After mounting the back plate with the Raspi attached, I noticed the computer is right over the HF receiver of the radio. That's of course a bummer, but there is no noise audible when listening to FM.
Raspberry power supply
The options here were to tap the tube heating voltage of 6.3 V or to simply hide a USB phone charger in the chassis. The first option seemed much more elegant but turned out to be problematic, because the whole radio circuitry has one common ground. Effectively this means that the rectifier would be a half-wave type resulting in ugly current peaks and strong ripple. A DIY voltage regulator would be necessary too.
Finally I decided on the phone charger, connected to mains right after the power switch of the radio. There is enough space in the enclosure to hide it. The right point to connect the cables has to be found in the schematic of the radio. These documents are widely available on the net.
Audio input
The last point to consider is the audio connection of the Raspberry Pi. In case you reuse the tube amplifier, you have to find the right place to connect the audio signal. As mentioned, the schematics are usually easy to find on the net, thanks to the many old radio enthusiasts out there. Note that even if the schematic looks simple, it might be difficult to find the right point in the radio. The reason is that there is no PCB but a very dense and wild wiring.
Things become really easy if you have a radio model with a separate input for external sound sources like the "AUX" input in modern amplifiers. My Olympia 59-3W fortunately provides such an input with two 4 mm DIY friendly banana connectors in the back plate. This input is called "TA" probably for "Tonabnehmer" (phono pick-up). The good thing about using the TA input is that you have a dedicated knob for the Raspi in the front panel and all other music sources (FM) still work.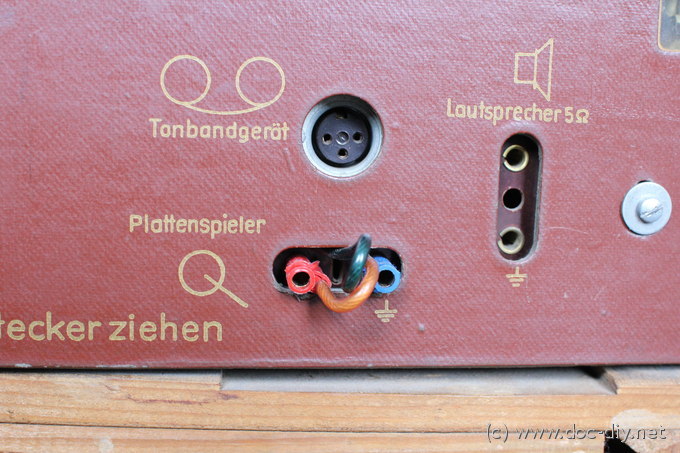
In the Olympia the input level of the radio matches the Raspberry well. No distortion is noticeable and the volume knob of the radio operates in the full range when the Raspi is set to 100%.
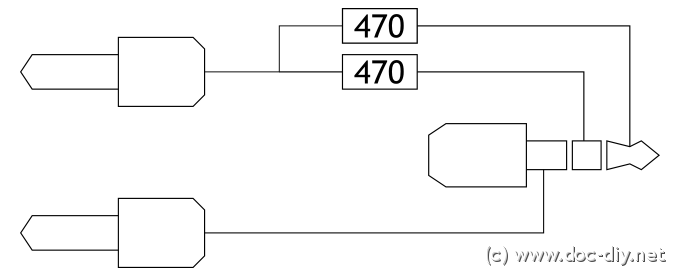
Since most tube radios are mono and the Raspi is stereo, you have to mix down the channels using resistors. Simply connect each stereo channel with a 470 Ohm resistor to the mono channel. The Raspi output is capable of driving headphones, so any value down to 32 Ohm should work. This image shows the electrical connection:
The audio quality of the Raspberry Pi is often criticised for its weak high range. Since the old radios will cut of the highs anyway, this is not an issue.
Pushbuttons
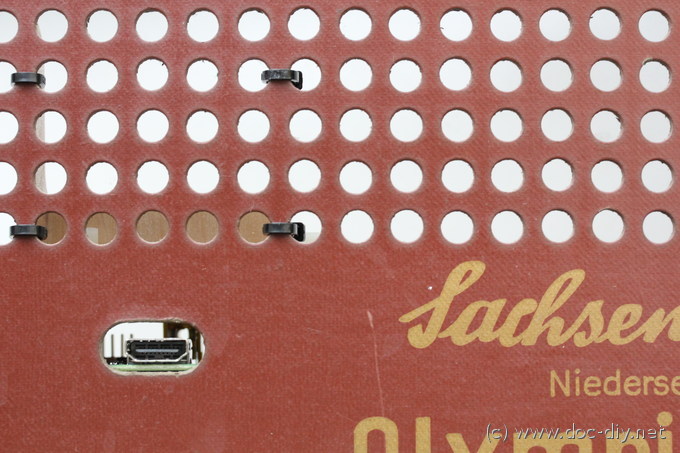
How to solve the user interface was an essential decision in the TubeNetRadio project. I looked for a possibility to operate the radio locally without the need to touch the phone or computer. The solutions range from no control at all to a large touch display in the front panel. I decided for a rather minimal interface with just two knobs in the backplate. Since all tube radios have some kind of ventilation perforation in the enclosure, it's easy to use the holes for switches. The hole diameter was 7 mm in my case.
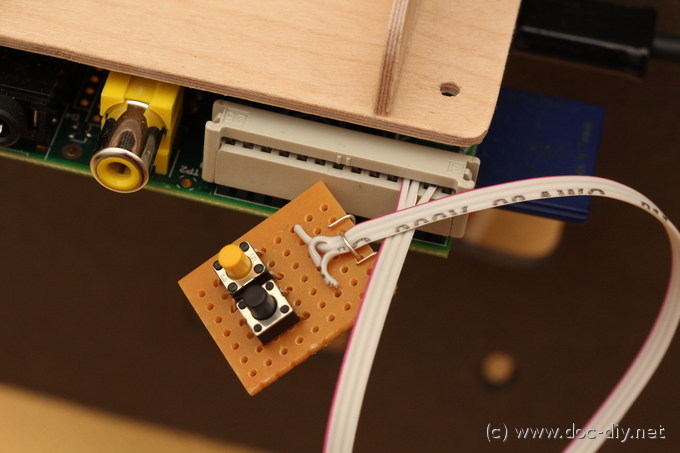
It turned out to be surprisingly simple to implement buttons on the
Raspberry Pi. In the image above you see my test circuitry with two buttons connected to the
GPIO connector.
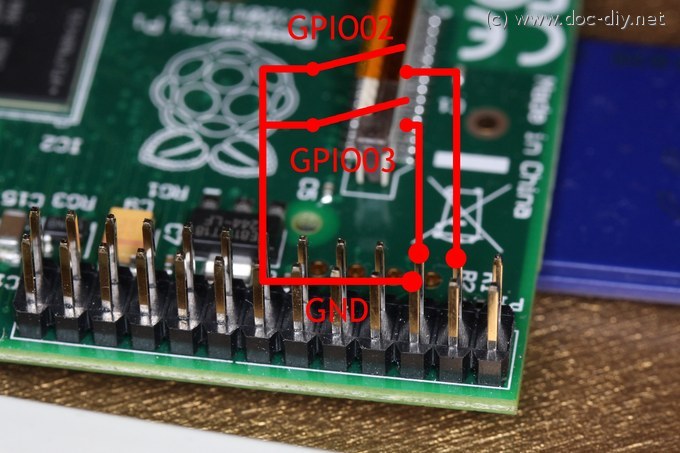
I have chosen the GPIO line used by the I2C bus because of the built-in pull-up
resistors. These resistors give the lines a defined state (logic 1 because they
pull "up") when the buttons are not pressed. When a button is pressed the lines
will be pulled down to ground and the Raspi reads a logic 0. Below is a
human-readable image of my wiring to which I refer in the source code.
The easiest way to hook up the buttons is a ribbon cable with the 26 pin
connector fitting the Raspberry. A connector with less pins stands out to far
on the sides and will probably not fit on the pin header.
Beware of this pitfall:
I accidentally used NC (normally closed) buttons and noticed that if the
GPIO lines are pulled down during boot, the boot will stop.
Please be sure you use standard NO (normally open) pushbuttons.
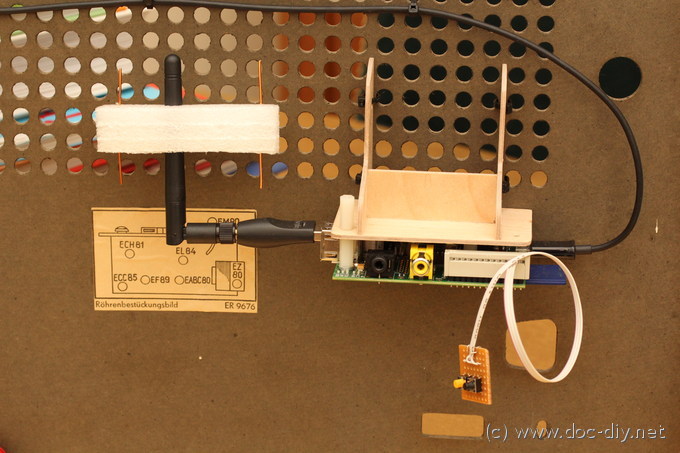
WLAN adapter
The last part worth mentioning is the WLAN adapter. An instable WiFi connection
is much more annoying when listening to internet radio than during surfing for
example.
In the beginning I used the popular Edimax EW-7811UN dongle. Later I switched
to the Logilink WL0151 with a bigger antenna.
My subjective impression was that the WLAN reliability improved with the
antenna type. The WLAN adapter works under difficult conditions because of
the aluminum foil FM antenna occupying quite an area at the sides. I also
tried a 3-element Yagi "booster" and saw noticeable changes in the signal
quality depending on the orientation. The setup is shown below.
Software
Compared to the hardware part, the software side of the TubeNetRadio project
turned out to be much more time consuming. It requires a careful planning to
avoid getting stuck in a dead end or ending up with an annoying user-unfriendly
something.
Several solutions exist with different levels of complexity.
In the following I will present four of them explaining some pros and cons.
Please note that this is just my subjective opinion and didn't take the time
to explore all details of each solution. I'll start with the constrains I have
posed in the beginning.
- Headless operation without a display
- Able to play local mp3s, network music and internet radio
- Able to play local music even if WLAN connection broken.
- Nice to have: Ability to have a play list
Plain Linux with command line music player
This option is great if you plan to listen to one or maximum a couple of predefined internet radio stations. Players like mplayer are very easy to install on all Linux distributions and are capable of playing mp3s and internet music streams. For switching between the radio stations buttons connected to the GPIO port will be needed. An advantage of this solution is simplicity, stability and independence from large media player projects and it's bugs. Reading the GPIO is possible from a shell script. The downside is an inflexible operation with no of-the-shelf remote control phone app.
mpd/mpc media player (+++ chosen for TubeNetRadio +++)
The words mpd and mpc stand for music player daemon and music player controller. This is a typical lightweight Linux combo. mpd lives in the background once started and plays the music, mpc can send commands to mpd, eg. play, pause, next, add to library, etc. The package is mature and perfect for headless operation. mpd is not capable of playing videos. It doesn't support UPNP directly. With mpd-python and RPi-GPIO the whole operation can be controlled by a single Python script. Having everything in Python is very programmer friendly and flexible. I was able to implement this solution based on Arch Linux.
Gmrender-resurrect UPnP/DLNA media player
This solution seems quite nice and UPnP is really widely supported,
also by commercial products.
I compiled the player and it worked OK. Although not very complicated
the installation took me finally a week end - Linux people know what
I'm talking about;)
All in all I can recommend this solution to people experienced with Linux.
One drawback of the renderer is
the small (one man?) developer community. The chance to get bugs fixed is not big.
I would recommend this solution to people with Linux affinity. Novices might
be a little overwhelmed with installing the libs and tools. UPnP is great.
I failed to compile Gmrender-resurrect on Arch. A very detailed instruction
how to install the player is given in
this blog.
Xbmc UPnP/DLNA media player (+++ second choice +++)
Compared to the media players described before, Xbmc is a giant with a huge
community of developers and ports to many platforms. Xbmc is an audio and
video player with a shiny GUI in no way inferior to commercial products.
My only concern was that Xbmc will not be fully operable without a display
connected as GUIsh as it is. During my tests it turned out not to be the
case. Several UPnP apps recognized the player immediately and even the
volume control worked. There was no need to connect a display.
Xbmc is available as ready to go SD card image based on different distros. Some of them are available on the official Raspberry site. Some are fast and thin, others running a fully equipped Linux in the background but slow. The first option was my choice. I tested Xbian and OpenELEC and picked Xbian because of the good performance. (OpenELEC had a quicker GUI but wasted time at network operations - purely subjective!). I didn't check Raspbmc because of it's image to be slow.
Xbmc seems to be a good option even for a pure audio player. Playing videos will be still possible. A weak point that stopped me from staying with this solution for good was the cumbersome controllability from the command line. All operations are basically possible, but first you have learn about the JSON-RPC interface. Sorting out which quotes go where takes time...
I stepped quite deep into Xbian. It would be my second choice after the mpd solution. If you can give up the buttons on the radio and like to operate the player with a smart phone, this solution is something for you. Only very basic Linux skills are required and setup time is short due to the SD card image downloadable.
Conclusion
After inspecting the tube radio for the first time, I was amazed how
far technology have been back then. Imagine, the radio still worked after
60 years. The solidity of the product is so incredible
compared to what we can buy now. Wood, metal, big speaker, tone control,
real knobs - all this became "luxury features" today.
How cool it would be to use this radio with modern media like internet radio
or the mp3s, I thought. After a quite a long time (broken Raspi, etc) I managed
to finish the project.
All in all the electrical and mechanical integration of the Raspberry Pi into
the tube radio is not very difficult. Things will be much simpler if you pay
attention to some details when buying the radio. The software part might keep
you occupied for a while. The general thought in which direction to go
software-wise are described above. In the
blog article I tried to provide all the information and files
necessary for the mpd player solution based on Arch Linux. The source code
there is version controlled by git. Feel free to improve it.
Here is a list of things I'd like to mention finally:
- Pick a model with an auxiliary audio input
- If you chose a radio with a functional tube amplifier and loudspeaker, you will be rewarded with a warm and clear sound and less DIY work
- If the radio buttons are functional you can still use the radio for its original purpose
- Big speakers give good sound with juicy bass, there are even stereo tube radios.
- Be prepared to burn 50 W constantly if you keep the tube amp. Go for semi-conductors for less energy consumption. Up to now this is the only drawback of the TubeNetRadio.
- Easy to operate by non-geek with two button solution
- The power-on to music time is about 30 s with the Arch mpd solution
- Reliable WiFi connection needed for internet radio

PHP Scripts Throwaway Email Throwaway Email


|
Last modified: Sun April 14th 2024 Copyright © 2024 www.doc-diy.net |
I like the idea of using an old tube radio with a guitar. This would look really cool on stage, also as a stack;)
In the beginning of the TubeNetRadio project I just connected an mp3 player to the radio and checked what the levels are while ramping up the volume. To my surprise, the input marked "phono or TA" wasn't very sensitive, more a normal line level. A guitar should work fine.
Just try it. You can't really fry the analog tube circuitry. If the level is too high, plug a 10k potentimenter in between.
Regards, Luk
Here is my version i build a few years ago.
Still going strong everyday!!
https://youtu.be/R3WIfeAnBTw
Kind regards,
E Legerstee
Litz wires get stiff after soldering and break easily.